Tasks are (still) not threads and async is not parallel

[cross posted from my MSDN blog]

I talk to a lot of developers who are either new to .NET or are moving from an older version to the newer platform and tools. As such I’m always trying to think of new ways to describe the nature of Tasks vs Threads and async vs parallel. Modern .NET development is steeped in the async/await model and async/await is built on the Task model. So understanding these concepts is key to long term success building apps in .NET.

In order to help visualize this I built a simple WPF application that displays a chart of an application’s activity. I want to display some of the potential variations in behavior of what appear to be a simple set of async tasks.

Take the following method

start code

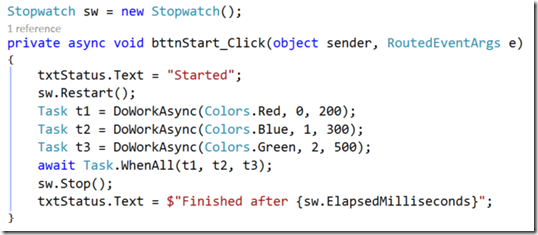
This is a simple event handler which is going to call 3 asynchronous methods and then wait for all three to complete and then print out how long it took to do the whole operation. How many threads are there? Some people will assume only 1, some will assume 3. Like everything in software, it depends.

The DoWorkAsync() method just runs a loop. Each time around the loop, it will do some sort of asynchronous task and then do some busy “work” for some amount of time, then it will draw a rectangle on the screen representing the time that it spent doing that “work.” (This is analogous to making a web service call and then doing some local processing on the data returned from the service.) In this way we can easily see (a) when the work is being performed, and (b) whether the work overlaps with other task’s work. If it does, then we are running on multiple threads. The work we are concerned with is our code (e.g. the local data processing) – not the thing being waited on (the async web service), so each bar in the app will represent the local processing.

no-async code

The first case is the simplest, the method is marked as async but we really don’t have any asynchronous work going on inside it. In this case, the method is actually going to actually run to completion synchronously, meaning that the tasks above (in the event handler) will all be complete immediately upon creation and there wont be any new threads. They will each just run one right after the other.

no-async

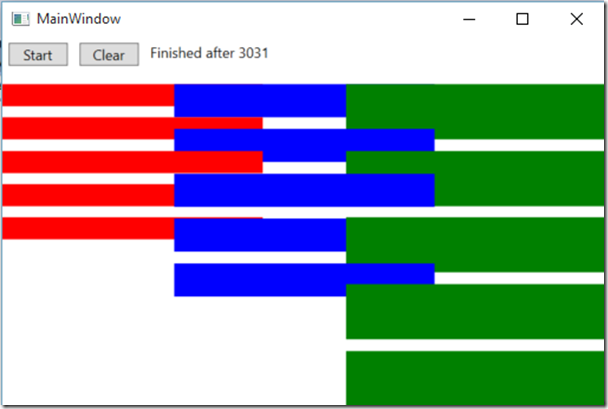
In this image, the vertical axis is time. So first the red task ran, then the blue task ran, then the green task ran. It took 5 seconds total because 5 loops * (200ms + 300ms+ 500ms) = 5 seconds. You can also just make out the faint white lines of each individual iteration of the loops. But only 1 thread was used to run all three tasks.

Now lets make one change. Add an asynchronous operation where the //TODO is. Typically this might be a web service call or reading from a file, but for our purposes we will just use Task.Delay()

regular-async code

The only change here is the addition of the Task.Delay to the beginning of the loop. This will cause the method to not complete synchronously because it is going to do an asynchronous wait at the start of every iteration of the loop (simulating our async service call wait). Now look at the result.

regular-async

It still took about the same amount of time, but the iterations are interleaved. They are not overlapping each other though because we are still on the same thread. When you “await” an asynchronous task, the rest of your method will continue running in the same context that it started on. In WPF, that context is the UI thread. So while the red task is doing its delay, the blue and green tasks are running on the UI thread. When the red task is done delaying and wants to continue, it cant until the UI thread becomes available so it just queues up until its turn comes back around.

(Also notice that we didn’t add 1.5 seconds (100ms * 5 iterations * 3 tasks) to the total operation time. That’s the async benefit, we were able to overlap the waiting time of one task with the work time of other tasks by sharing the UI thread while we were waiting.)

But sometimes, this interleaving doesn’t happen. What if you have an asynchronous task that finishes so fast, it might as well be synchronous?

async-completed synchronously code

When the async plumbing goes to work, it first checks to see if the async operation is completed.  Task.Delay(0) will be completed immediately, and as such will be treated like a synchronous call.

async-completed synchronously

Well that puts us back to where we started. All 5 red iterations happen first because there is no asynchronous work to wait on.

Everything happens on the same thread context unless you tell it not to. Enter ConfigureAwait().

async-config await false code

ConfigureAwait(false) tells the async plumbing to ignore the thread context, and just continue on any old thread it wants. This means that as soon as the red task is done with its delay, it doesn’t have to wait for the UI thread to be available. It runs on a random threadpool thread.

async-config await false

Two things to notice here. First, since they are not bound to only running on the UI thread, they are running overlapped at the same time on multiple threads. Second, it only took 3 seconds to complete all three because they were able to fan out across multiple threads. (You can explicitly see the Task.Delays here because they are the white gaps between each bar)

Now what happens if we combine Task.Delay(0) with ConfigAwait(false)?

async-completed synchronously config await false code

Now we have a async task that will actually complete synchronously, but we are telling it not to bother with affinity for the threading context.

async-completed synchronously config await false

Completed synchronously wins. If the task completes synchronously already, then the async plumbing doesn’t come into play.

Summary

Look at this from the perspective of the original event handler above. The event handler has absolutely no idea whether its tasks are going to run on one thread or multiple threads. All it knows is that it has requested 3 potentially asynchronous tasks to be completed. The underlying implementation will determine whether additional threads come in to play or not. And whether you have multiple threads determines whether you run in parallel or not. So you need to be prepared for either behavior when writing and debugging your app because in the end, it just depends.

(Side note: The parallel behavior above is a side effect of the async/await thread context affinity in the WPF task scheduler. It is not guaranteed and the behavior may vary depending with different task schedulers. It should not be relied upon as a method to create other threads. If you require something to run in parallel, use Task.Run())

The example project used here is available in my GitHub repository.

Posted in Dev Stuff, Programming | 2 Comments

Visual Studio Tip #7: Whole line editing

[cross posted from my MSDN blog]

OK here is a quick simple one. How do I move or edit entire lines of code?

#1 Just don’t select anything.

If you don’t have anything selected in your code window then the commands for copy, cut and paste work as if the entire line of code was selected.

So if you need to quickly duplicate a line, don’t bother trying to get a whole line selected. Just put the cursor on the line then type Ctrl+C, Ctrl+V and you’ll see the new line pasted below the old line.

#2 Just move the line. Put your cursor on the line in question and use Alt+UpArrow or Alt+DownArrow to move the entire line up or down in your file.

This post is part of a series of Visual Studio tips. The first post in the series contains the whole list.

Posted in Windows Phone | Leave a comment

Visual Studio Tip #6: Turn on those line numbers (with Quick Launch)

[cross posted from my MSDN blog]

Writing code is very often a collaborative process and to discuss something you need to be able to refer to it. The simplest way to refer to a line of code is “look at line #26.” For some reason though, line numbers are not on by default. Before Visual Studio 2013 (which syncs your preferences across machines) turning on line numbers was one of the very first things I did on a every new computer.

Now how to do that? – Quick Launch! Visual Studio is a massive product with tons of options. Finding the one you need is more easily done via search. The Quick Launch box(that text box in the upper right on the title bar of the window) searches Visual Studio instead of searching your code (use Navigate To for searching code).

1 - quick launch

To find the options regarding line numbers, just type “Line Numbers” into the Quick Launch window and it will show you what it finds in the options dialog, the menus, and any open documents names & paths (but not the contents).

2 - line numbers search result

Select the item in the Options section. It tells you how that the Line Number option is in the General tab of the All Languages section of the Text Editor options. Visual Studio will open the Options dialog to the correct page. Check the Line Numbers box and close the dialog box.

3 - options dialog

Other stuff – you might have noticed the Task section of the Quick Launch results. Sometimes there are tasks you can run directly as well. In this case I could have just clicked the task and it would have changed the setting for me without opening the dialog.

This post is part of a series of Visual Studio tips. The first post in the series contains the whole list.

Posted in Windows Phone | 3 Comments

Visual Studio Tip #5: Quickly adding a namespace “using” statement

[cross posted from my MSDN blog]

One thing that slows down new C# users is the requirement to add “using” statements to the top of your file. This is because they just want to declare a variable and use it but aren’t necessarily familiar enough with the classes and namespaces to have predicted the need for the namespace when they were at the top of the file. So they end of hundreds of lines into a file and realize that the class they need to use requires a using statement all-the-way-at-the-top.

There are a couple of ways to add a using directive to your file to include the namespace. The obvious way is to scroll all the way to the top of your file and type it in. But that’s also the slowest and most error prone and takes you away from the line of code you are working on. The quickest way is just two key strokes and doesn’t move your cursor.

Imagine we want to write this method

image

The WebClient class is in the System.Net namespace which is not one of the ones usually included in a newly created file. So when you start to use it you get red squigglies because you need to put “using System.Net;” at the top of the file

image

But don’t scroll all the way up there. Instead, when you finish typing the class name, keep your cursor on the word WebClient (or right at the end). Then press the Control key and the Period key   (Ctrl + ‘.’)

This will reveal the Resolve menu

image

The first item is highlighted and says “using System.Net;” so press Enter to accept that. Visual Studio will put that using statement at the top of your file with the others. You will know that it is there because the WebClient text will change color to indicate it is a now recognized type.

image

then just continue typing in the rest of your code.

image

There are other ways to do this such as right clicking on the word WebClient and looking for “Resolve” in the context menu but I find that the simple keystrokes of Ctrl+ ‘.’ and Enter are quick and efficient because my cursor never moves and interrupts my code writing flow. This will work for any symbol that your cursor is on – as long as the assembly for the type is already added to your references.

This post is part of a series of Visual Studio tips. The first post in the series contains the whole list.

Posted in VSTips | Leave a comment

Visual Studio Tip #4: Code Snippets

[cross posted from my MSDN blog]

There is lots of code that we write that follow standard patterns with some minor changes for our exact situation. Visual Studio has a nice feature called Code Snippets which provides a way to create reusable code templates for common scenarios. The idea is that you activate the snippet, then just enter the needed values.

The ones I use the most are the snippets for .NET properties. There are actually two, one called “prop” and another called “propfull”. The code snippets are available from intellisense, so if I start typing “prop” inside my class and I can see the snippet

snippet1

Then I select the snippet (hit Tab once to select the item in intellisense)

Then hit Tab again to activate the snippet. This is the result

snippet2


A template of code is inserted and activated. Notice the two yellow rectangles? Those are the values I need to enter. Its like a little form for my code. In the image, the cursor is on the “int” one. If I press Tab again, it will select the next rectangle. In this way I can just type a new value in the rectangle, then press Tab to move to the next rectangle and enter the value there. So I just tab from one box to the next, changing values as needed and when I’m done, I press Enter and go back to regular code entry mode.

Try this: type “prop”, <Tab>, <Tab>, “string”, <Tab>, “Name”, <Enter>

You will end up with a simple property of type string named Name.

snippet3

Now try the propfull snippet.

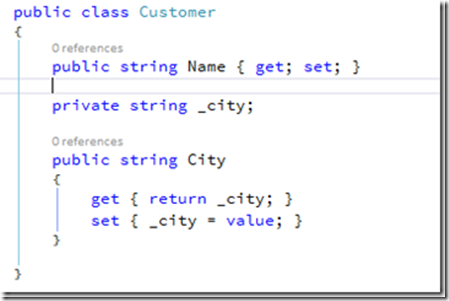
type “propfull”, <Tab>, <Tab>, “string”, <Tab>, “_city”, <Tab>, “City”, <Enter>

snippet4

The propfull code snippet creates a full Property with a field to store the property’s value. Notice that when you entered “_city” that it changed in all 3 places in the code snippet.

Using these two code snippets you can very quickly fill out a new class’s properties.

There are lots of built in code snippets for lots of different things and you can also easily create your own (like I did for Windows 8 apps). To discover what’s available, you can right click anywhere in your code and select “Insert Snippet” and you’ll get access to all the snippets by category. (If you work in XAML be sure to check out propdp and propa)

For more on Code Snippets see the documentation.

This post is part of a series of Visual Studio tips. The first post in the series contains the whole list.

Posted in VSTips | Leave a comment

Visual Studio Tip #3: Use “Navigate To”

[cross posted from my MSDN blog]

I spend a lot of time looking at other people’s code. That means a lot of time searching other people’s code. One of the main tools I use is not Search but “Navigate To”. It is found on the Edit menu or you can use the keyboard shortcut “Ctrl + Comma” to bring up this tiny window in the upper right corner of your code window.

Then just type and Visual Studio will search code files, file paths and code symbols in real time. If you select an item, that file will be displayed in the temporary reusable tab. It does not do a full substring text of your code though, so it gives a more focused search result. For example, if I search “viewmodel” get the viewmodel classes and files, but I do not get any results where I use the term “viewmodel” in the comments.

There are two handy refinements you can add into the mix here.

First is prefacing your query with ‘@’. That will refine the results down to just code symbols

Second is to use camel casing. If you use all caps camel casing you can pull up items without having to spell the whole thing out. This comes in very handy when dealing code that has long symbol names.

NOTE: Navigate To has been in Visual Studio for a while but it changed to this implementation in VS 2013. If you only have VS 2012 you can install the Power Tools for VS 2012 and get this behavior.

This post is part of a series of Visual Studio tips. The first post in the series contains the whole list.

Posted in Programming, VSTips | Tagged | Leave a comment

Visual Studio Tip #2: Pin your data tips

[cross posted from my MSDN blog]

Most people know that when you are debugging, you can hover the mouse over a variable in your code and the tool tip will provide you the current value.

For example, if I hover over the “uri” variable below it shows me that it’s current content is “http://azure.microsoft.com/”

PinDataTips

That is very helpful, but what if I am going in and out of this code very often. Say I’m calling the function multiple times and I want to see this value each time. I want to quickly glance at the value instead of having to hover and wait.

I could use the Watch Window and add the uri variable to that. Then it would always show me the value but its not as convenient as it could be.

Look at the right end of the data tip. That is a pin! Click that.

pinyourtips2

Now the value is pinned in place right where I can see it – no hunting for it. It is pinned to line 30 and will stay there while I’m in debug mode (even if I stop and restart debugging). It will update in real time and, because it is right in the code, I have the context to know exactly what it is for.

In addition, if I hover over the pinned data tip, I can add a comment to help me remember why I pinned it there.

pinyourtips3

For more on Data Tips, see the documentation

This post is part of a series of Visual Studio tips. The first post in the series contains the whole list.

Posted in VSTips | Leave a comment

Back to basics: Visual Studio tips

[cross posted from my MSDN blog]

Lately I’ve been working a lot with developers who are completely new to C# and/or Visual Studio. So I’ve been trying to gather some features and workflows which I’ve seen new users overlook which will make them a little more productive. A large amount of “a little more productive” turns into  “very productive” very quickly. 

To me its not about knowing how to do something. Its knowing that you can do it at all. This will be my list of those things. Some will be short and sweet others will be longer. Some have been in Visual Studio for a decade and some are new. Even if you are an experienced Visual Studio user, at least glance at the titles because you never know what you don’t know. Or you may read one and have a better way to do it. If so, let me know in the comments and we can all learn together.

As I add tips in subsequent posts, I’ll add a link here so it has the whole list in one place.

OK, on to tip #1!

Visual Studio Tip #1

Install the Productivity Power Tools

The first thing I do after installing Visual Studio, is install the power tools. This is a set of extensions provided by the Visual Studio team that add additional functionality to Visual Studio. There have been a set of power tools for each version of Visual Studio since 2010 and often the power tools features make there way into the next version of Visual Studio. So it helpful and like a little glimpse into the future.

You can get a full list of the features it adds at its page in the Visual Studio Gallery so I’m not going to go into detail about them here. I’m just going to say – install it. You can thank me later.

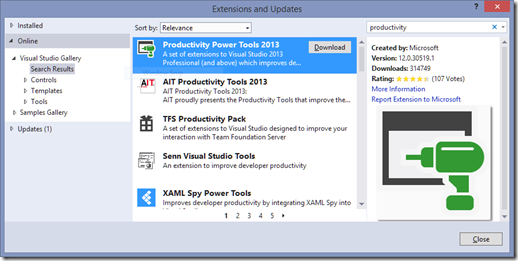
You can install it from the page in the Visual Studio Gallery but the easiest way is to just have Visual Studio kick off the process for you. Select “Extensions and Updates” in the Tools menu.

VSTipsExtensionMgr

Then make sure you have the “Online” tab selected in the left panel and search for Productivity. When you find it, click the Download button to start the download and run the installer.

image 

You will probably be asked to restart Visual Studio after the install is completed. From then on, Visual Studio will notify you if there is an update to the tools.

Posted in VSTips | Leave a comment

Speaking Zork

How do you update an old-school text adventure game to run on a modern smartphone? You teach it to talk.

This is an update to an idea I was playing with a few years ago. I ported a Z-Machine interpreter to Windows Phone to see if you could play a text adventure on a device with a virtual keyboard. It seemed to work fine and then went into the closet until last week when I was thinking about the new voice functionality in Windows Phone 8.1. So I got out the app and spent about an hour upgrading it to Windows Phone 8.1 and adding the speech recognition and the text to speech functionality.

The surprising thing is how well it works. There are a few methods you can use to do speech recognition on Windows Phone. I used the simplest one, the generic recognizer (so I didn’t have to tell it what words to listen for) – and it works great. It was so easy I’m surprised its not found in lots of more apps in the store.

Posted in Dev Stuff, Tinkering, Windows Phone | Leave a comment

Tasks and awaits and Rx! (And Drones!) Oh My!

(cross posted from my MSDN blog)

A few people I work with are tinkering with an off-the-shelf drone in our spare time and so we are writing a C# library to control it.

The way it works is you send UDP commands to the drone and you receive a stream of status & navigation UDP packets from it. So everything is asynchronous by default. You don’t send a command and get back an “I got it!” response. You have to send a command and then monitor the status for a change reflecting your desired state,

For example, to start flying, you must repeatedly send the “take off” packet every few milliseconds until you see the “is flying” flag set in the status packets. Lets see what that would look like.

We want the SendCommand method to be asynchronous and totally decoupled from the UI. So the send process looks like this.

image

When we call SendCommandAsync() the command gets queued and the method returns immediately. Then there is a Task whose sole job is to take commands out of a queue and send them to the drone. This keeps them in order but prevents the caller from waiting behind anything that had previously been queued.

Now that SendCommandAsync() is async, the trick is “how do we know when the command has actually been sent?” Well we can use a TaskCompletionSource and queue it with the command. Then the worker Task sets the completion when it actually sends the command.

 1: public Task SendCommandAsync(DroneCommandBase command, CancellationToken token)

 2: {

 3:     TaskCompletionSource<object> tsc = new TaskCompletionSource<object>();

 4:     this._cmdQueue.Add(new CommandInfo()

 5:     {

 6:         TSC = tsc,

 7:         Cancel = token,

 8:         Command = command,

 9:     });

 10:     return tsc.Task;

 11: }


1: success = this._cmdQueue.TryTake(outcommandInfo);

 2: if (success)
 3: {
 4:     // send the command data
 5:     this._cmdWriter.WriteString(commandInfo.Command.ToString());
 6:     await this._cmdWriter.StoreAsync();
 7:     // signal completion of the send Task
 8:     commandInfo.TSC.SetResult(new object());
 9: }

(As an aside, this is an excellent example of when Tasks are not Threads. We can dump 10,000 commands into the queue and get 10,000 Tasks but will never generate a new thread. The Task represents the completion of the operation “Send a command to the drone”.)

Now that we have an async send command we can start to build on top it in a very natural way. The Take Off procedure requires us to send the command multiple times until it takes off. So we can add a method that sends multiple commands until a cancellation is requested

 1: public async Task SendRepeatedCommandAsync(DroneCommandBase command, TimeSpan delay, CancellationToken token)

 2: {

 3:     while (!token.IsCancellationRequested)

 4:     {

 5:         await SendCommandAsync(command, token);

 6:         await Task.Delay(delay);

 7:     }

 8: }

then we can add a method to provide a condition upon which the send will stop repeating

1: public async Task SendRepeatedCommandUntilAsync(DroneCommandBase command,

TimeSpan delay, Func<NavData, bool> condition, CancellationToken token)

 2: {

 3:     var localCTS = new CancellationTokenSource();

 4:  

 5:     var navDataStream = from data in NavigationDataStream

 6:                         where condition(data)

 7:                         select data;

 8:  

 9:     // start the repeated command sequence

 10:     SendRepeatedCommandAsync(command, delay, localCTS.Token);

 11:  

 12:     try

 13:     {

 14:         // Take(1) so that the sequence ends after the first item

 15:         await navDataStream.Take(1).ToTask(token);

 16:     }

 17:     catch (TaskCanceledException cancelEx)

 18:     { 

 19:         // the caller cancelled the operation

 20:     }

 21:     finally

 22:     {

 23:         // stop the commands from repeating further

 24:         localCTS.Cancel();

 25:     }

 26: }

Notice we are not ‘await’ing the SendRepeatedCommandAsync call. We just want to initiate that process and will cancel it when we are ready. Also in this case I’m using Reactive Extensions to model the navigation data stream. It is an asynchronous stream so its feels natural and provides a nice LINQ experience on top of it. NavigationDataStream is defined elsewhere as IObservable<NavData>.

Now from a higher level we can write this code to perform the take off.

 1: public async Task TakeOff()

 2: {

 3:     Command takeOffCommand = new Command(Argument.TakeOff);

 4:     await _connection.SendRepeatedCommandUntilAsync(

 5:         takeOffCommand,

 6:         TimeSpan.FromMilliseconds(20),

 7:         data => (data.drone_state & (uint)Constants.FLY_MASK) == (uint)Constants.FLY_MASK

 8:         );

 9: }

This describes exactly what I want, send the command every 20 milliseconds until the drone state shows that its flying. Following that pattern of thought, I can later start composing other items and scripting things

 1: public async Task SampleScript()

 2: {

 3:     await _droneController.TakeOff();

 4:     await _droneController.FlyForward();

 5:     await Task.Delay(5000);

 6:     await _droneController.FlyBack();

 7:     await Task.Delay(5000);

 8:     await _droneController.Land();

 9: }

Broken down, each function is simple enough to understand and debug. This simplicity only comes from the power of Rx, the TPL and the async/await functionality. Imagine what the code would look like before when all the timers and .NET events and state would have to be managed directly.


Small disclaimer: all this code was written *without* the drone to test it (Its in Seattle and I’m in Dallas). So while the logic is sound and it compiles I haven’t been able to test it outside of a simple console app harness. Any glaring issues that arise due to eagle eyed commenters will be corrected. Even so, the larger point is that async/await is much more than just “do an async call here.” The concept of creating your own Tasks to represent your own operations becomes a powerful mechanism that allows easier higher level composition logic.

Posted in Dev Stuff | Leave a comment